Saturday, 24 November 2012

Some important updates - 1

One of the items on the Surveyor's report when we bought our Finesse was a recommendation to improve the stowage of the gas bottle and the connection to the stove to comply with relevant standards.

Here is a how I made a new gas bottle locker that is gas-tight with a drain out through the hull.  I used the Boat Safety Scheme Part 7 technical literature and other info mined via the Web in order to set it out.

 This is how we had been keeping the 4.5kg bottle from flying around; lashed to the suction hose of the bilge pump.  Its previous stowage was behind the engine's control panel and above the starting battery - not good.

This is the connecting pipe where is goes from flexible hose to copper before vanishing through the bulkhead on its way to the stove.  There was not one clip along its entire length and too many joints.


I decided to make a gas-tight box and install it in the same locker with a drain out through the yacht's side.  Here I am deciding which plank to put the skin-fitting in.


A box was made to fit the space to carry the 4.5kg bottle out of 9mm marine plywood.


Trying the box for size - there was just enough room for it to stand in the base of the cockpit locker and for the lid to go over it - just!


The regulator wouldn't fit but a little modification gave a space for the flexible rubber hose to run.


The box was completely sheathed with GRP and painted. Here it is with the hose taken through a protective sleeve in the side of the box. In the base of the box is an in-fill to keep the bottle central. Still to be fitted is a webbing strap and clip to hold the bottle down.


This picture shows the drain from the bottom of the locker.  It is a requirement to have a minimum of 19mm internal diameter on the drain hose and fittings so I used 3/4" fittings. A 'fall' is needed all the way from the box to the outside air and this was a fiddle to achieve...


As can be seen in this picture as water is caught in a low point of the pipe. A clip now holds this up to continue the downward 'fall' of the drain pipe.  The seacock is shown closed in this picture.  We close it when sailing as water fills the locker as the boat heels, leaving it open when she is moored un-occupied.


Here is the drain outlet - just above the normal water line.  I was not keen on having to bore another hole in the yacht's hull but such is the price of safety regs compliance..


A new copper gas pipe was run in one run, clipped with non-corrosive rubber lined P-Clips to a batten fastened to the hull. The flexible rubber tubing lengths were kept to a minimum length and the whole of the gas pipe line is visible for inspection.


I fitted a shut-off valve adjacent to the stove. A looped length of flexible rubber hose allows the gimballed stove to move.


The main problem I had with the installation was buying tubing and fittings.  It was possible to buy BSP fittings, but only for metric tube, its seemed, and then impossible to find a source of metric copper tube in reasonable lengths.  In the end I used 5/16" tube bought from one supplier and fittings from a couple of others including our local Chandler's - this took more time than actually doing the job!

Sunday, 23 September 2012

Summer 2012

Just after we commissioned 'Enfys' for the 2012 season 'Seafair Haven 2012' came to the Milford Haven Waterway.  The weather was dreadful for the most part with poor visibility and high winds.  We slogged up to Lawrenny getting soaked and had a poor night's sleep as the wind howled rattling the rigging. Have I mentioned how 'noisy' a clinker hull is as waves lap and slap under the lands?  Makes getting some rest difficult at times. However the next day we mad our way with some of the fleet of small boats right up to Cresswell Quay for breakfast. Only a shoal-draught yacht like a Finesse can get up a creek like this.  Cresswell Quay was once very busy as a loading point for coal from the Pembrokshire collieries but is now a quiet backwater with a nice pub!


'Enfys' joins the fleet at Cresswell Quay
 Whilst we were 'upriver' we had a go at exploring the upper reaches of the Eastern Cleddau and sailed  up with a following wind against an ebb tide, eventually deciding to turn about near Slebech with the muddy banks closing in on each side.  Unfortunately on the return trip I 'cut the corner' near Picton Point and unsure of where the channel was put her aground, too late I worked out that the big plastic bilge-keeler I thought was anchored was already ashore!  It was 1 1/2 hours to low water and we had a 3-hour wait.  Luckily we had a good stock of beers on board!

Dryed-out at Landshipping - The yacht in the background was already aground.
 During the summer we had a few day-sails around the lower reaches of the Haven and have paid a few visits to Dale.

Reefed for a fresh breeze near Thorne Island
 The summer threw some unsettled weather at us for the most part and most of our sailing was reefed. On on sail inside the Haven with two reefs in we  managed a record (For 'Enfys') 7.5kts.

A fine day for sailing in Pembrokeshire


A rainbow over Lindsway Bay near Dale


Monday, 2 July 2012

In commission at last!

We finally got the antifouling and painting completed between rain showers - and tides! It is a filthy un-cherished job that was made more difficult by the boat lying directly on the mud (oh for the luxury of being on nice timber blocks in a boatyard!) The wind was blowing hard too whistling between the keels and coating me with almost as much paint as the boat...
 Topsides, bottom paint and boot-top all done!

 Hanging the rudder that I had previously painted off the boat.  We were against the clock now as we were floating her off on the next high water and the flood was approaching fast!
'Enfys' is now back on her outer mooring after getting her off over the Diamond Jubilee Bank Holiday weekend.  Since then it has been mostly rain and gales, and more gales :(

Wednesday, 9 May 2012

Some more maintenance..

After a long winter of recuperation now the spring of 2012 is here - despite the iffy weather - I have made a start on a few of the winter maintenance jobs to get finished before re-commissioning.

One of these was to sort out the guardwire stanction bases that remain filled with water and have been rotting out the wooden pads:-


I unbolted a couple of the worse looking ones and let the soggy but sound hardwood pad dry out, primed it and bedded the stanction base back on using Sikaflex. Whilst the base was off I filed a drain groove in its underside to discourage it from filling with water.


The wooden pads are tapered to make the steel stanctions stand vertically upright regardless of the boat's sheer and the camber of the deck.  However the whole design is not the strongest; the inboard pair of bolts are about 4" long and pass right through the boat's inwale (beam shelf) which is strong, but the outer pair are brought up under the deck between the planking and inwale. There is a tendancy for the deck to be 'peeled' up by any inward load on the guardrails and the bond has been strained here and there letting water in - not good.  We like the security of the guard wires but will have to give some thought to a better arrangement for securing the stanctions....?

Coming up in the next post or two will be another couple of 'improvements' I have been working on before Enfys is commissioned for the 2012 season:- A proper vented, draining gas bottle locker, that is long overdue and was a survey recommendation, and a different way of switching the engine starting and boat supply batteries on and off.

Thursday, 15 September 2011

Some maintenance jobs 1

Instead of being able to sail Enfys during 2011 I decided to catch up on some maintenance that I was unable to carry out over the winter of 2010/2011 for various reasons..
First on the agenda was to service her engine; A 20hp 3-cylinder Beta diesel, installed by her previous owner in 2003:-

The engine was run for some minutes to warm the oil and then it was pumped out and replenished with fresh 15W40 The oil filter (out of sight under the alternator on the port side of the engine) was eventually unscrewed.  It is only about 50mm in dia and too small for my normal oil filter wrenches.  A new band type wrench that needs a 1/2" socket drive was eventually found to fit.  This now lives in the boat's toolkit, as does the special rubber-band type strap wrench I had to buy to get off the fuel filter. This is mounted in a very, very fiddly position next to the sump pump on the starboard side of the engine and is a pain to replace.

I then turned my attention to the cooling system;  Beta advises that the heat-exchanger should be stripped and cleaned annually.  We had not yet tackled this job so here goes...

Trying to drain the antifreeze I encountered the first problem;  Opening the drain tap low down on the starboard side of the block produced nothing.  The whole tap and its elbow is choked with corrosion...


I tried poking with wire, blowing back up it etc., etc. to no avail.  In the end I gave up and instead I syphoned as much of the coolant out of the engine as I could via the heat exchanger filler cap.
The heat exchanger end cap bolts were removed, raw water feed pipe disconnected and the caps tapped off. With a little bit of persuasion the tube stack was pushed out of its housing.  I was surprised to find how much scale had built up in the stack tubes and end caps.  There was also a quantity of sea weed and pump impellor fragments all lodged in there:-


I 'rodded-out' the tubes (about 25% of which were blocked) and cleaned the scale from all the parts.

An area of concern is that the tube stack and end caps are of yellow metal - presumably brass - but the heat exchanger housing is an aluminium alloy! The after end cap has a boss in which is screwed a sacrificial anode but despite its presence the after edges of the housing are deeply pitted with corrosion. This may be because of previous raw water leaks...


The tube stack was refitted and the exchanger built back up with new 'O' rings greased with Vaseline.  I then topped the system up with fresh coolant.  I really had wanted to drain the engine's coolant entirely but that will have to wait until I can resolve the blocked drain tap. Finally, a new sacrificial anode was screwed into the housing.

The raw water pump obviously needed attention.  It is a Jabsco directly driven from a camshaft extension at the front of the engine.  Ooer! On the Finesse the engine has been installed so close to the main bulkhead that I couldn't even get at the screws with my stumpy driver:-


Not having any other tools available I had no option but to remove the pump from the engine.  It is held by two clamps and nuts:-


Pump removed from engine:-


With the pump removed I took it home to my bench and took it apart to find an impellor that was coming to bits.  This was quickly replaced with a new spare well lubed with Vaseline. I had to make a new paper gasket and then re-assembled the thing.


Back at the boat I had to line up the drive spigot with the shaft dog and fiddled the pump back into place.
Now I can hear you saying 'what if the pump had failed at sea...?'.  Well, I'm also concerned about this and will be looking for an 'easy-access' cover for the Jabsco with thumb screws and a built-in cover seal...

The 'Vee' belt was tightened again, the gearbox oil level checked and control cables greased.

Fuel filter replacement has been left for now, until Enfys is re-commissioned, as I intend to drain the rest of her fuel (the tank was not topped off when she was laid up) and refill with fresh.  When she came to us there was a lot of black sludge in her tank and I had the whole lot apart during her initial fit-out in our ownership, as the tank ( A plastic Vetus 60-litre) had been poorly installed causing fuel to leak from the top and water to get in.


Monday, 13 June 2011

Still laid up...

The 2011 season is getting off to a slow start for Enfys as her skipper has been unwell and is due to go into hospital in mid June for another operation. As her GRP companions on the beach have been prepared and floated off to their summer moorings, Enfys has been left behind.  The mooring officer of the local boat club remarked that the slowness of the refit must be because she is wood and in his mind 'wooden boats take a huge amount of upkeep... no time for sailing....' However I was able to correct him on that point as it was her skipper that needs the 'repairs' this time and in fact the boat is OK to go.


Laid up on the beach with winter cover on


 Anyway, once her skipper is sorted he will have some spare time whilst recuperating to get on with a couple of jobs that didn't get done during the winter whilst he was ill.

In the meantime here is a picture from a previous season when Enfys went inland exploring the upper reaches of the Eastern Cleddau river at the top of the Haven.  Although still tidal she is anchored here near Slebech and only about a mile from the limit of navigation:


Anchored in the ebb flow near Slebech


Sunday, 22 May 2011

A new forehatch

Enfys' forehatch was the standard, simple affair that she had been built with. The Finesse builder had constructed the coamings with drains through the outer coaming that aim to prevent water from passing as seas are shipped aboard. Then, for some reason chose to finish it off with a very basic flat-topped hatch cover with little strength and no camber to shed water!  In my opinion it looked out of place and, additionally the plywood top had started to rot from rainwater ingress and, to top it all the vent was broken... An ideal opportunity to make some improvements.....

Here is the rotton plywood cut from the old hatch with my penknife stuck in the softened wood:


The old plywood was cut away with the jigsaw and the frame cleaned up.  The camber of the surrounding deck was marked onto a template and transferred to suitable lengths of 3/4" thick iroko that were then glued to the fore and aft rails of the hatch frame and then carefully faired in:


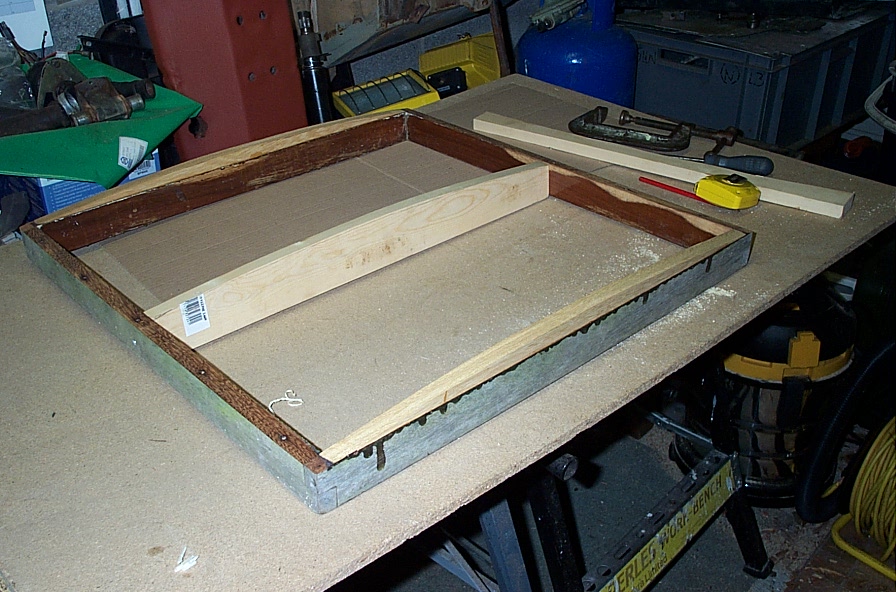
The intention was to bend a new plywood hatch top over the cambered frame.  However the original top was 3/4" thick and it would have been well nigh impossible to bend such thick ply over the lightweight frame. What I did was to attach a temporary frame with identical camber half-way across the hatch opening to support the ply as it was bent over the frame:


The new plywood hatchtop was made from three skins of 1/4" marine (BS1088) 5-ply.  Each skin was laid at 90deg to the previous and glued with West Epoxy 205/106.  As the job was done in winter I had to do the job indoors where it was warmer. (In the workshop it was well below freezing and no place to cure Epoxy!)  Once the final skin was cured the edges were faired round, a hole cut for the vent and the whole top - and especially the edge grain of the ply - were sealed with a coat of epoxy prior to painting and varnishing:


Here is the finished hatch in place.  Painted with 'Interdeck' cream and varnished frame and inner and fitted with a new ECS 'Tannoy' type closeable vent.  The hatch is hinged at its after edge and clipped from below. There are two portable wedges that can be inserted into slots in the coamings (not shown) to prop the hatch open for ventilation. Water now sheds nicely off the hatch.